Falling Sakura Book Nook: DIY Lighted Wooden Bookend
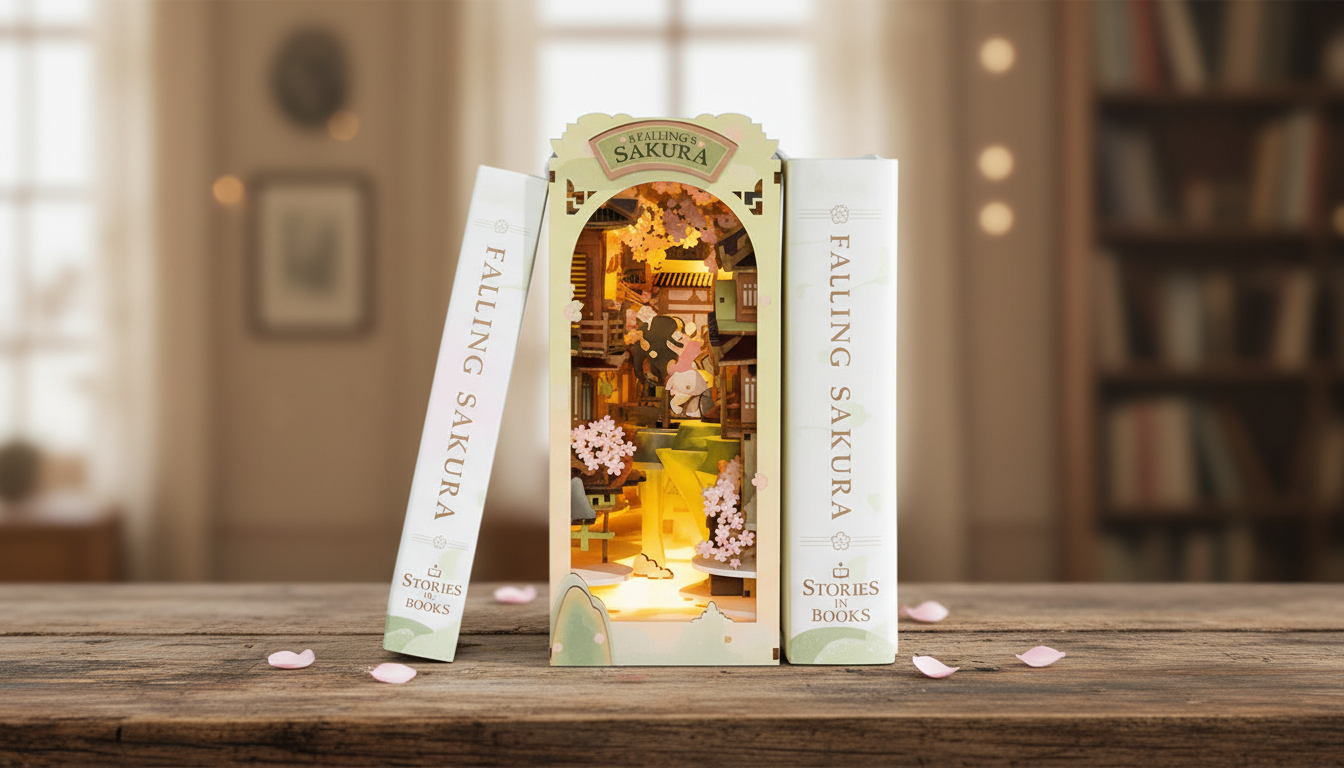
Falling Sakura Book Nook with Lights – A DIY Wooden Bookend Decoration That Glows
A book nook turns an ordinary shelf into a miniature scene that glows between novels—part décor, part craft project. The Falling Sakura Book Nook with Lights pairs layered wooden details with soft lighting to create a cherry-blossom alleyway effect that feels calm by day and cozy at night. Designed as a DIY build, it’s an engaging weekend project for crafters and a standout accent for readers, study spaces, and gift-giving moments. Set it between books as a bookend-style insert, or display it on a desk or console for a small, illuminated focal point.
If you’re ready to add that “tiny portal” look to your shelf, the Falling Sakura Book Nook with Lights – DIY Wooden Bookend Decoration is made for exactly that kind of display: compact, detailed, and designed to shine once the lights are on.
What Makes a Book Nook So Captivating
Book nooks are small enough to live on a shelf, but they’re built like a stage set. The most satisfying ones use layering and perspective to trick the eye into seeing a deeper scene than the physical space allows.
- Creates depth on a shelf using layered panels, cutouts, and perspective details.
- Adds warm ambience with built-in lights that highlight the scene after dark.
- Balances “hands-on build” satisfaction with a finished piece that looks like boutique décor.
- Fits naturally into reading corners, home offices, and dorm shelves without needing wall space.
The “between-books” placement is part of the magic: the nook looks like it’s been hiding in your library all along, especially when it’s framed by taller hardcovers on either side.
Falling Sakura Theme and Display Ideas
The Falling Sakura style leans into softness—gentle architectural lines, delicate blossom details, and a warm glow that reads as cozy rather than flashy. It’s a look that complements a lot of interiors without taking over the room.
- Cherry-blossom styling brings a gentle, seasonal look that pairs well with neutral or pastel interiors.
- Works as a shelf “portal” placed between hardcovers or as a standalone décor piece on a side table.
- Looks especially striking beside poetry, travel books, Japanese literature, or art books.
- For a cohesive shelf: repeat tones with blush book covers, light wood frames, or warm-white lamps.
Cherry blossoms are a classic symbol of spring and fleeting beauty—one reason the theme feels instantly calming. For a bit of background on cherry blossom seasons and why they’re such a beloved tradition, the National Park Service’s cherry blossom resources are a helpful reference point.
What’s Included and What to Prepare
A DIY wooden book nook kit is all about precision and patience: small parts, layered assembly, and careful alignment so the final piece looks crisp and square. The included lighting is what pushes it from “mini craft” to “mini atmosphere,” making fine cutouts and shadows visible even across a room.
- DIY wooden components are designed to assemble into a compact book-nook insert with an illuminated scene.
- Lighting adds a finished look and makes fine details visible from across the room.
- Recommended basics to have ready: craft glue, tweezers, a small file or sandpaper, and a soft cloth for cleanup.
- A tidy workspace and good overhead lighting help keep small parts aligned during assembly.
Quick Checklist for Building
| Item | Purpose | Tip |
|---|---|---|
| Craft glue (wood/craft) | Secures structural joints and detail layers | Use small amounts to avoid squeeze-out on visible edges |
| Tweezers | Positions small decorative pieces | Curved-tip tweezers improve control in tight corners |
| Sandpaper or nail file | Smooths tabs/edges for a cleaner fit | Lightly sand before gluing for better alignment |
| Clips or rubber bands | Holds pieces while glue sets | Protect surfaces with scrap paper or cardboard |
| Soft cloth | Wipes fingerprints and dust | Dry wipe first; avoid soaking any wood |
Lighting: Placement, Mood, and Everyday Use
For general guidance on safe use of decorative lighting, the U.S. Consumer Product Safety Commission (CPSC) lighting safety tips offer practical reminders that translate well to any small lit décor: avoid pinched cords, don’t overload power sources, and turn lights off when unattended.
Assembly Overview for a Clean, Square Build
Where It Looks Best at Home
For a cozy “gift bundle,” pair the craft build with something that supports a relaxing, slow weekend. A digital read like Smart Thrift: Unlocking Style Without Wasting Money – A Strategic Guide to Thrift Shopping fits nicely if the recipient enjoys creative projects and curated décor—especially if they like hunting for the perfect shelf accessories to match the nook’s soft tones.
Care and Longevity
A Thoughtful Gift for Readers and Crafters
For anyone who loves calming décor and miniature worlds, the Falling Sakura Book Nook with Lights – DIY Wooden Bookend Decoration delivers a finished look that feels far more custom than its compact footprint suggests.
FAQ
How long does it take to assemble a DIY book nook like this?
Most builders can expect a few hours spread across a weekend, often around 4–8 hours depending on how quickly glue sets and how detailed the layering is. Dry-fitting and taking short breaks while sections cure can extend the total time but usually improves the final alignment.
Do the lights run hot or damage books nearby?
LED lights are typically low-heat, so they’re unlikely to warm nearby books during normal use. Leave a small air gap, avoid pressing the light components directly against paper edges, and turn the lights off when unattended for added peace of mind.
What tools are needed beyond what comes in the kit?
Common basics include craft glue, tweezers, and sandpaper or a small file, plus clips or rubber bands to hold pieces while drying. Optional helpers like a precision knife and cutting mat can make small cleanups easier, but gentle handling matters more than specialized tools.













Leave a comment